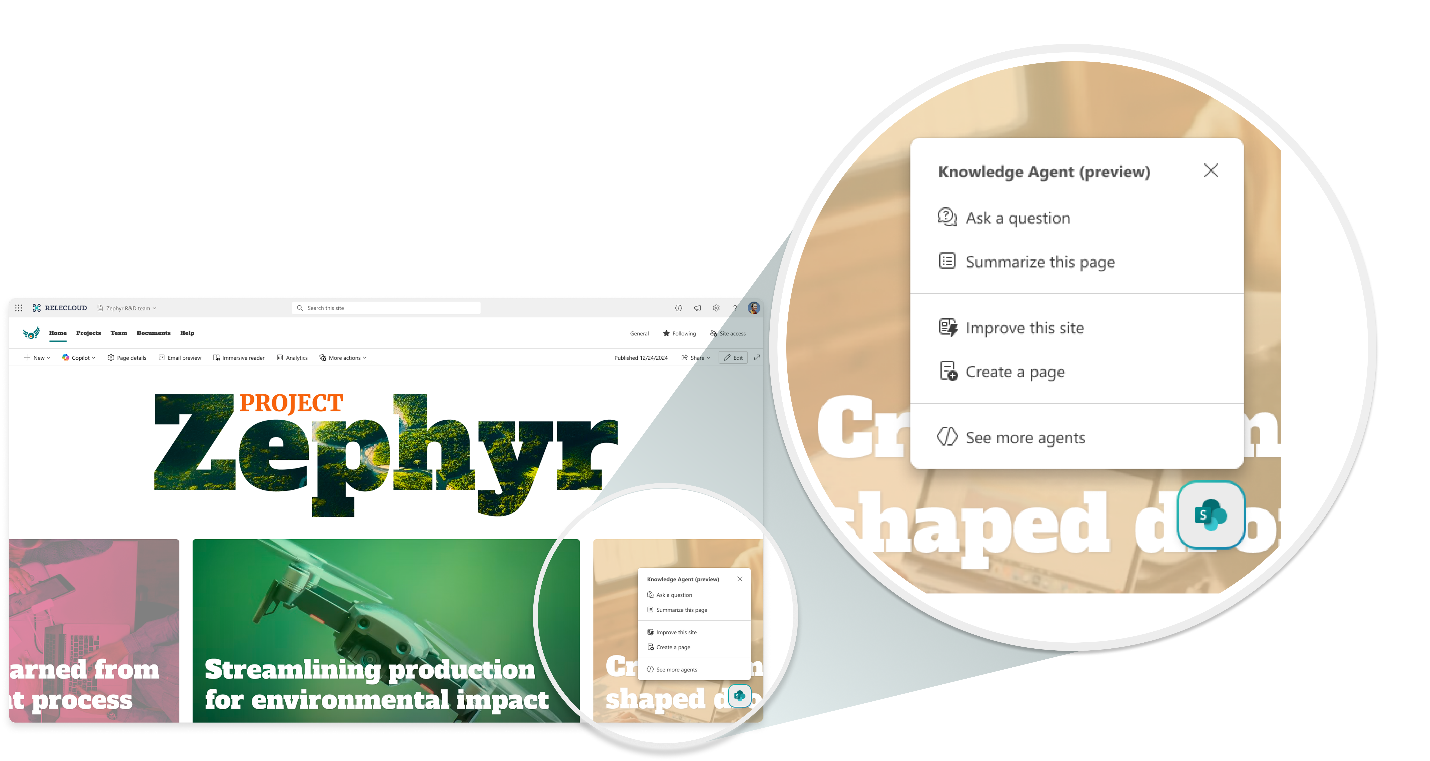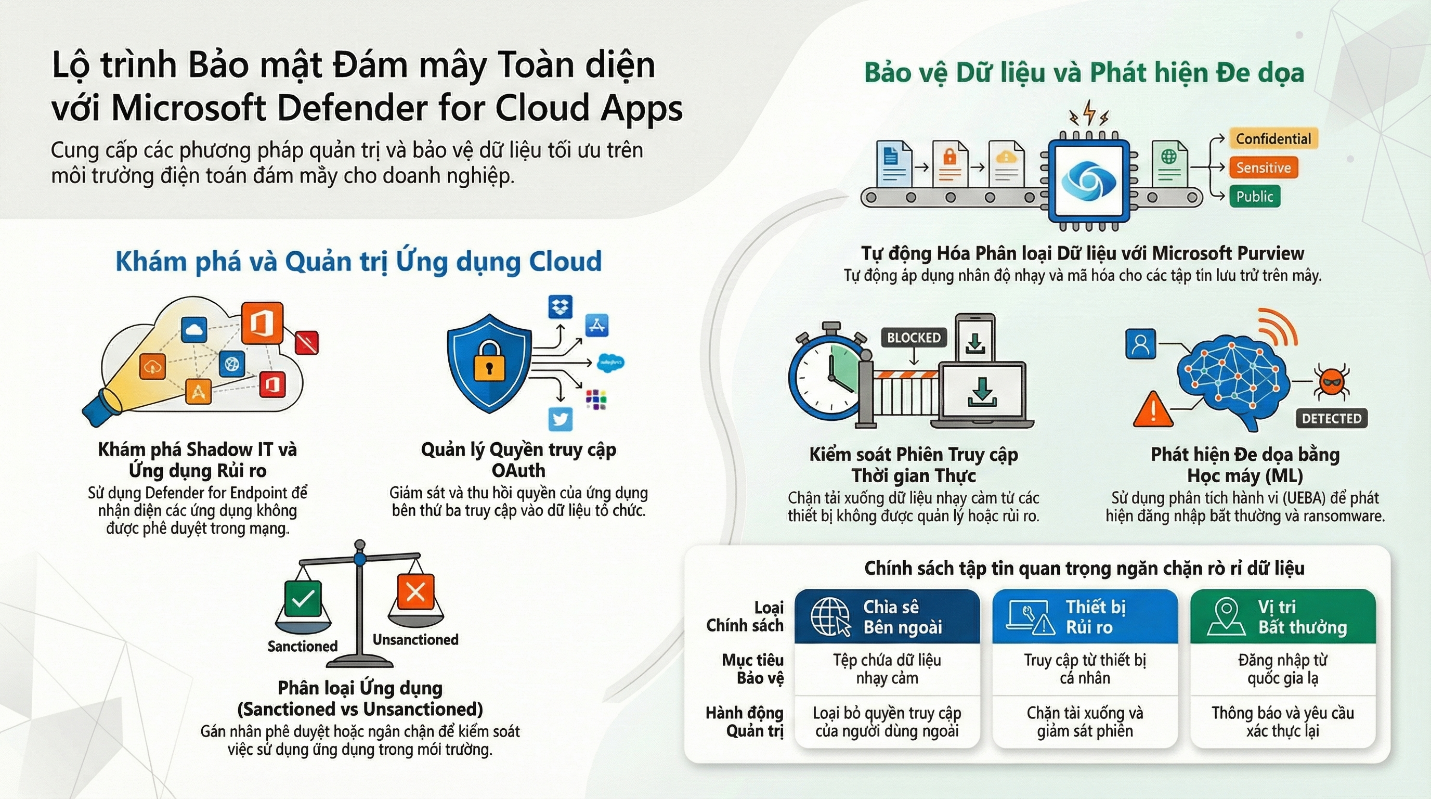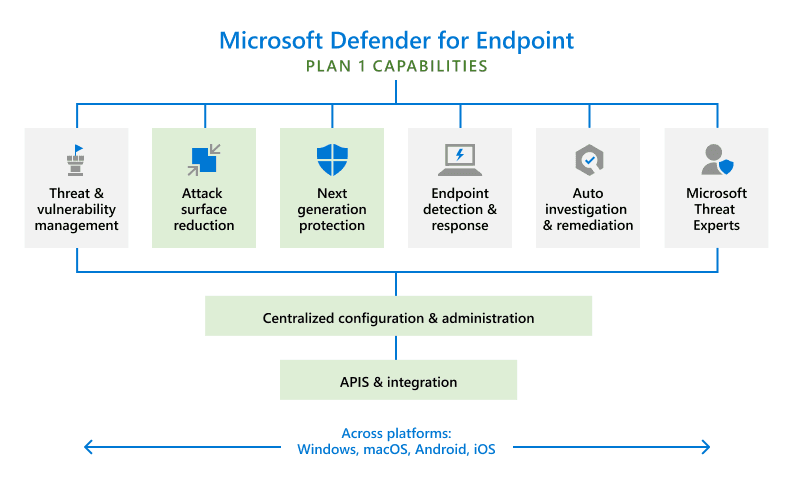
Tại sao nên sử dụng (Shielded VMs) ?
Shielded VMs trong Windows Server 2025 giúp bảo vệ các máy ảo khỏi quản trị viên Hyper-V bằng công nghệ mã hóa. Việc gắn thiết bị vTPM vào các máy ảo Hyper-V cho phép người dùng tăng cường bảo mật và tính toàn vẹn hệ thống. Quản trị viên Hyper-V chỉ có thể bật hoặc tắt máy ảo.
Tổng quan, ngay cả khi quản trị viên (IT Administrator) trên Host chạy HyperV hoặc Hacker xâm nhập chiếm quyền truy cập lớp vật lý, tất cả dữ liệu VM vẫn an toàn.
Shielded VMs mang lại những lợi ích sau:
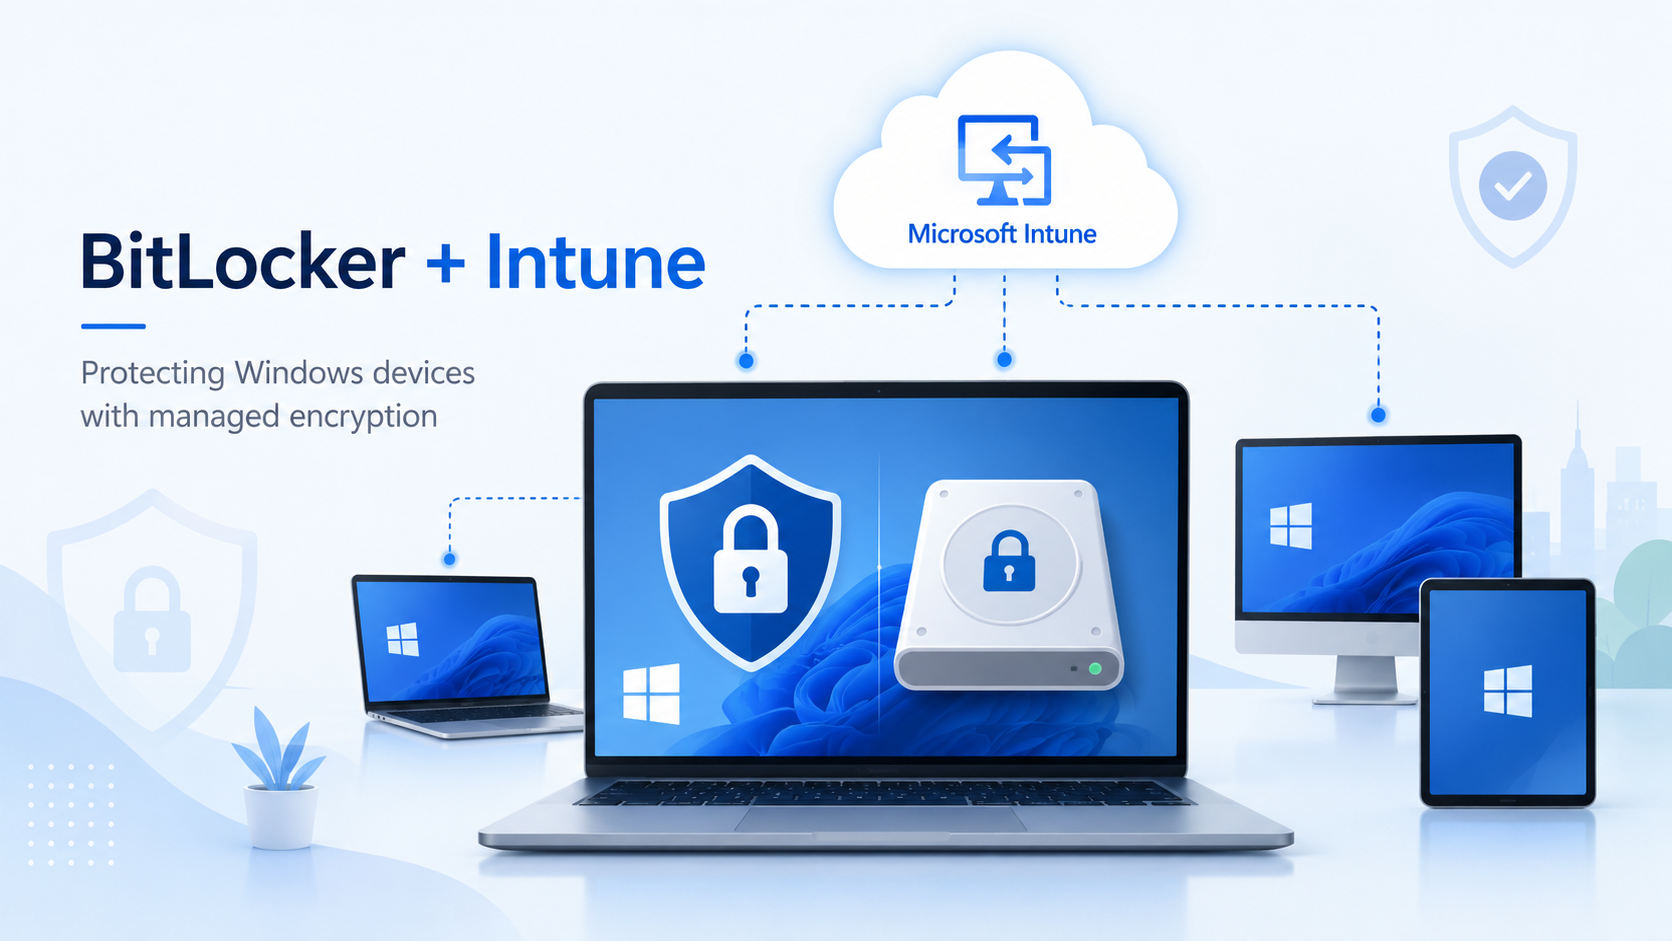
- Ổ đĩa được mã hóa bằng BitLocker (khóa được bảo vệ bởi vTPM của nó)
- Một tiến trình xử lý VM (VMWP) được tăng cường giúp ngăn chặn việc kiểm tra và can thiệp trái phép.
- Tự động mã hóa lưu lượng di chuyển trực tiếp cũng như mã hóa tệp trạng thái thời gian chạy, trạng thái đã lưu, điểm kiểm tra và thậm chí cả các tệp Hyper-V Replica.
- Không có quyền truy cập bảng điều khiển, đồng thời chặn PowerShell Direct, Guest File Copy Integration Components và các dịch vụ khác cung cấp các đường dẫn khả thi từ người dùng hoặc quy trình có quyền quản trị đến máy ảo.
Điều kiện cần có:
Không cần System Center VMM trong quá trình triển khai này.
- Guarded Host: WS2016 TP5 Datacenter (Secure Boot enabled)
- Host Guardian Service Host: WS2016 TP5 (Secure Boot enabled)
- AD Domain Controller Host: WS2008R2/WS2012R2/WS2016 TP5
- Tenant Host: Windows 10/WS2016 TP5
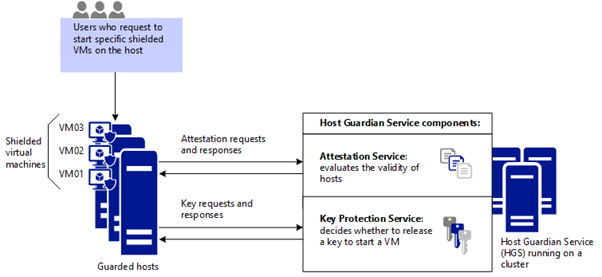
Windows Server 2025 đi kèm với tính năng (Host Guardian Service – HGS), cung cấp các dịch vụ xác thực và Key Protection để các Host được bảo vệ có thể chạy các VM được bảo vệ (Shielded VMs). Xác thực từ xa HGS kiểm tra trạng thái cấu hình Host và xem nó có được bảo vệ hay không. HGS Key Protection cho phép truy cập phân tán vào các khóa vận chuyển được mã hóa để cho phép Guarded Hosts và thực thi Shielded VMs..
Trong quá trình cài đặt HGS Server, việc triển khai một “Domain” là bắt buộc và được nâng cấp thành Domain Controller. HGS yêu cầu thiết lập mối quan hệ tin cậy “one-way cross” giữa các “forest” từ miền HGS đến bộ điều khiển AD domain controller với tất cả các node được liên kết an toàn. AD group đó sẽ được xác thực với HGS Server và bất kỳ thành viên nào cũng sẽ được coi là Guarded host, một Node an toàn và sẵn sàng chạy các máy ảo được che chắn (Shielded VMs).
AD Configuration
Tạo “AD group” chứa tất cả các Host được coi là an toàn và sẽ chạy các VMo được bảo vệ (Shielded VMs):
$GuardedGroupName=‘Guarded Hosts Group’# hostname of a secure node which will run Shielded VMs$guardedhost=‘guarded’$guardedGroup = New-ADGroup -Name $GuardedGroupName -SamAccountName ‘GuardedHosts’ `-GroupCategory Security -GroupScope Global# $GroupMember should look similar to “CN=$cn, DC=$dc”# ex: “CN=guarded,CN=Computers,DC=dev,DC=com”Add-ADGroupMember -Identity $GuardedGroupName -Members $GroupMember# $guardedGroup.sid.Value will be used as an Identifier when setting up the attestation for HGS$guardedGroup.sid.Value
Host Guardian Service Configuration
Install-WindowsFeature -Name HostGuardianServiceRole –IncludeManagementTools -Restart
# $HGSDomainName is the Host Guardian Service domain set up during HGS installation# the node will be promoted to a domain controller for the specified domain$AdminPass = ‘Password’$HGSDomainName = ‘hgs.com’$adminPassword = ConvertTo-SecureString -AsPlainText $AdminPass –ForceInstall-HgsServer -HgsDomainName $HGSDomainName `-SafeModeAdministratorPassword $adminPassword -Restart
$certificatePasswd = ‘Password’$signingCertPath = ‘C:\signingCert.pfx’$encryptionCertPath = ‘C:\encryptionCert.pfx’$certStoreLocation = ‘Cert:\LocalMachine\My’$certificatePassword = ConvertTo-SecureString -AsPlainText $certificatePasswd –Force$signingCert = New-SelfSignedCertificate -DnsName “signing.$env:userdnsdomain” `-CertStoreLocation $certStoreLocationExport-PfxCertificate -Cert $signingCert -Password $certificatePassword `-FilePath $signingCertPath$encryptionCert = New-SelfSignedCertificate -DnsName “encryption.$env:userdnsdomain” `-CertStoreLocation $certStoreLocationExport-PfxCertificate -Cert $encryptionCert -Password $certificatePassword `-FilePath $encryptionCertPathInitialize-HGSServer -HgsServiceName $HgsServiceName `-SigningCertificatePath $signingCertPath `-SigningCertificatePassword $certificatePassword `-EncryptionCertificatePath $encryptionCertPath `-EncryptionCertificatePassword $certificatePassword -TrustActiveDirectory -Force
Add-DnsServerForwarder –IPAddress $ADDnsIpAddress
$HGSDomainName = ‘hgs.com’$ADDomainName = ‘dev.com’$ADDomainUser = ‘Administrator’$ADAdminPasswd = ‘Password’netdom trust $HGSDomainName /domain:$ADDomainName /userD:$ADDomainName\$ADDomainUse /passwordD:$ADAdminPasswd /add
Add-HgsAttestationHostGroup -Name “Guarded Hosts” -Identifier “$GuardedGroupSID”
GuardedHost Configuration
Install the necessary roles:
Install-WindowsFeature -Name HostGuardian
Install-WindowsFeature -Name RSAT-Shielded-VM-Tools
Install-WindowsFeature -Name FabricShieldedTools -Restart
Để các Host được bảo vệ có thể phân giải tên máy chủ HGS, thực hiện thêm DNS forwarder để Host được bảo vệ có thể xác thực với HGS:
Add-DnsServerConditionalForwarderZone -Name $HgsDomainName -ReplicationScope “Forest” ` -MasterServers $HgsServerIP
Thực hiện cấu hình Hyper-V host xác thực với HGS server:
Set-HgsClientConfiguration -AttestationServerUrl “http://$HGSDomainName/Attestation” `-KeyProtectionServerUrl “http://$HGSDomainName/KeyProtection” -confirm:$false
Get-HgsClientConfiguration
Booting a Shielded VMs
Các bước thực hiện bên dưới sẽ được áp dụng trên máy chủ Hyper-V không phải thực hiện trên Guarded Host.
Để tạo một VM được bảo vệ (shielded VM), cần có một “shielded VM template” và “pdk file” chứa dữ liệu về các Guarded Hosts, chứng chỉ và các thông tin khác liên quan đến Shielded VM
Install the following roles:
Install-WindowsFeature -Name RSAT-Shielded-VM-Tools
Install-WindowsFeature -Name FabricShieldedTools -Restart
Generate a shielded template
Hiện tại, Windows Server 2025 là hệ điều được hỗ trợ khi sử dụng các mẫu đĩa đã được ký. Hãy đảm bảo rằng đĩa đáp ứng các yêu cầu BitLocker sau:
- Được định dạng bằng hệ thống tệp NTFS.
- Không sử dụng tính năng Dynamic Volume.
- Ổ cứng phải có ít nhất hai phân vùng. Một phân vùng phải chứa ổ đĩa cài đặt Windows. Đây là ổ đĩa mà BitLocker sẽ mã hóa. Phân vùng còn lại là phân vùng hoạt động, không được mã hóa để VM có thể khởi động.
Các thao tác được thực hiện trên giao diện Microsoft PowerShell
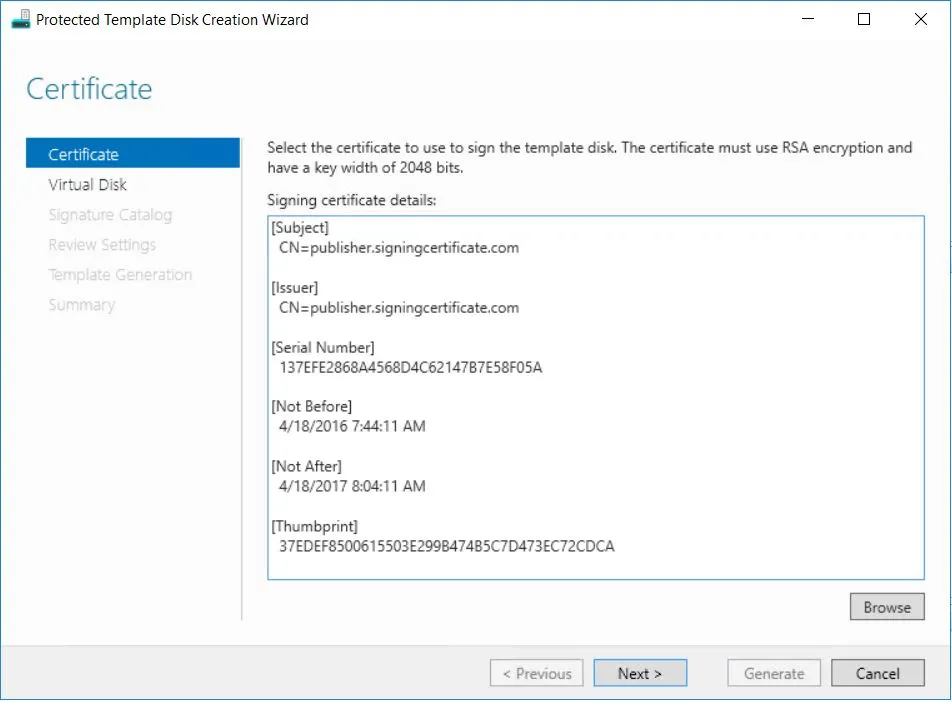
Generate a self-signed certificate to sign the disk:
$certificate = New-SelfSignedCertificate -DnsName publisher.signingcertificate.com `-CertStoreLocation $certStoreLocation -KeyExportPolicy Exportable
# $certificate is used to sign the template disk
# Specify a disk name and version
# .VHDX image is modified by embedding the .VSC file in it so making a copy of the image is recommended
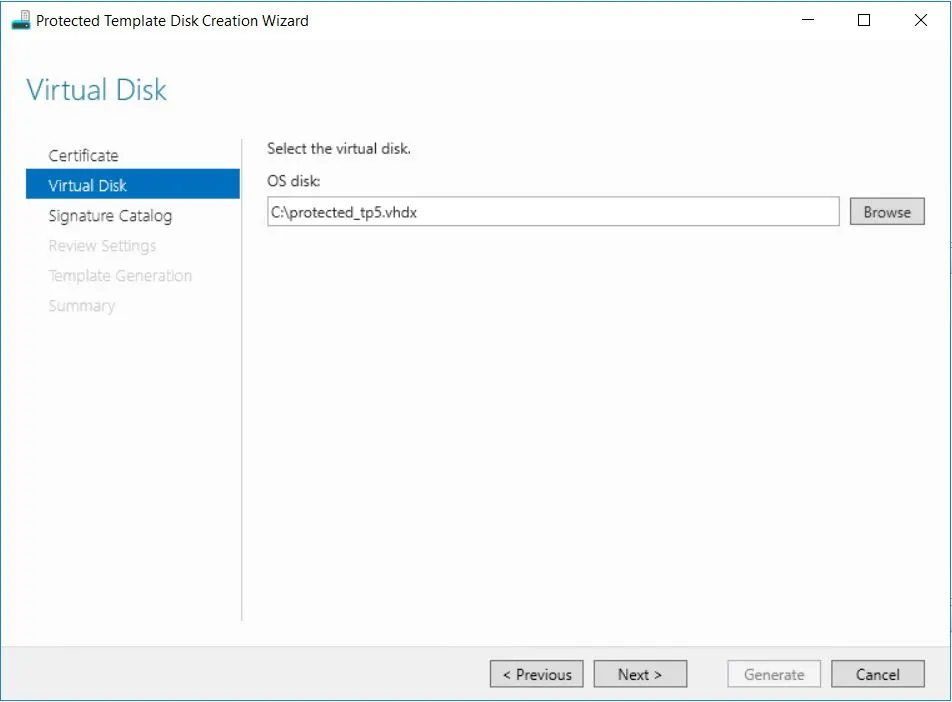
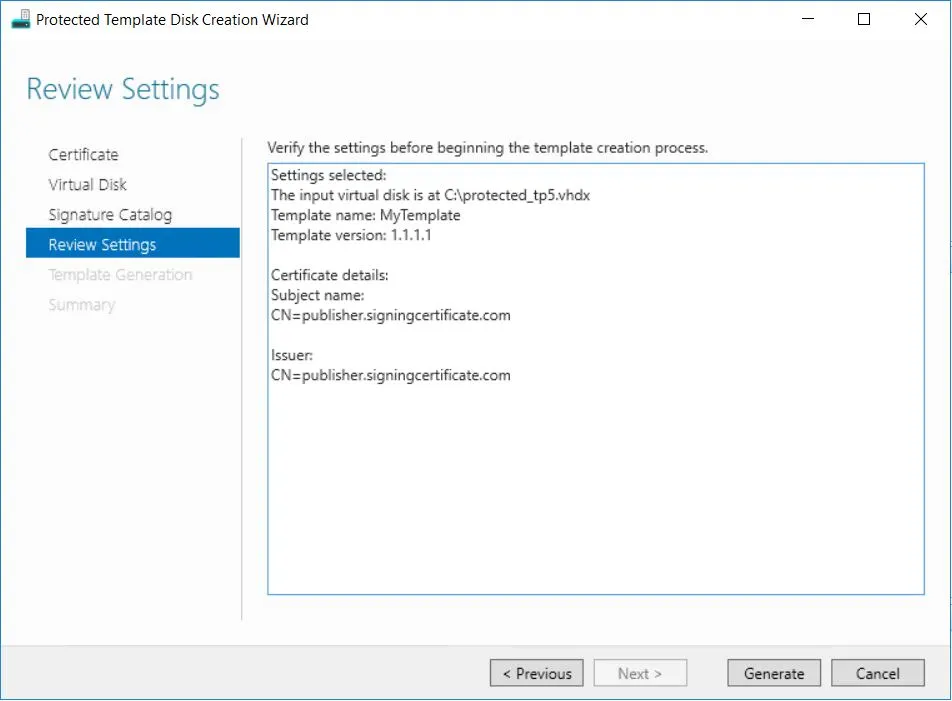
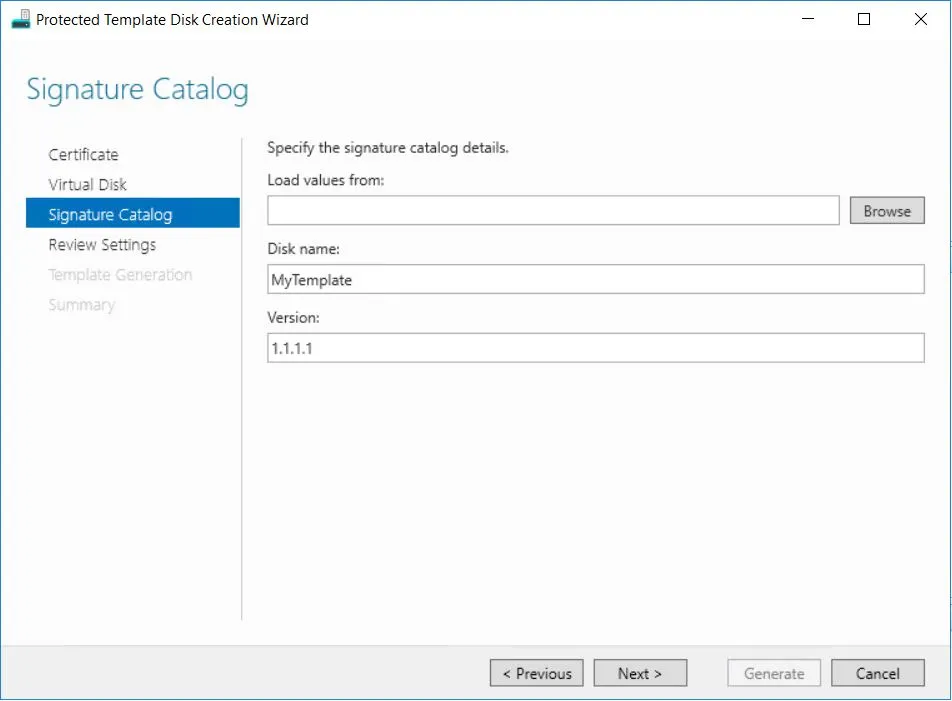
$TemplatePath = ‘C:\protected_template.vhdx’
$TemplateName = ‘MyTemplate’
$Version = ‘1.1.1.1’Protect-ServerVHDX -Path $TemplatePath -TemplateName $TemplateName -Version $Version ` -Certificate $certificate
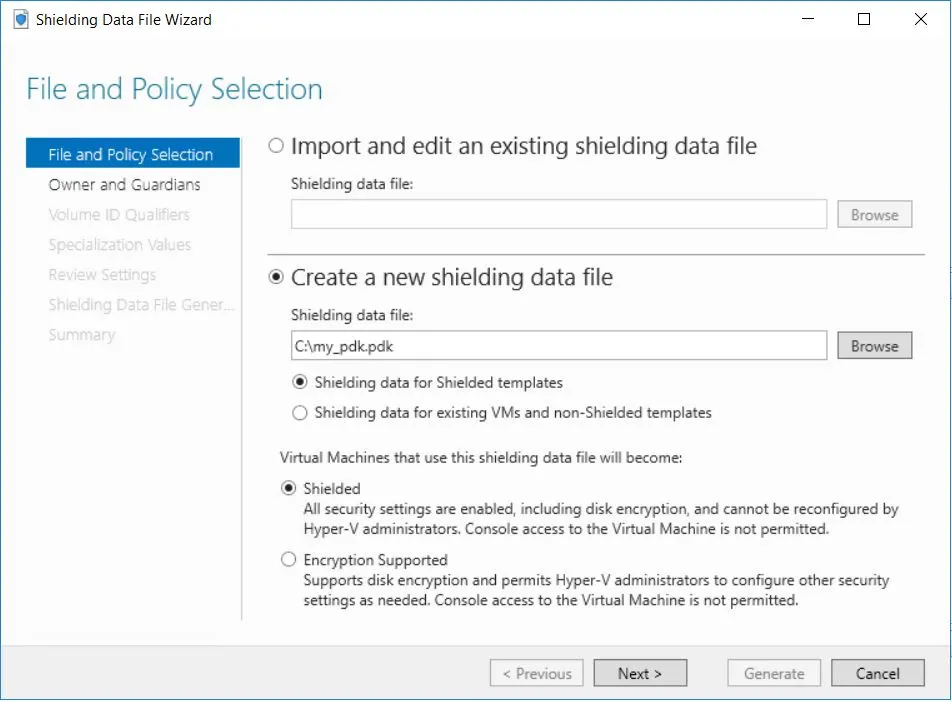
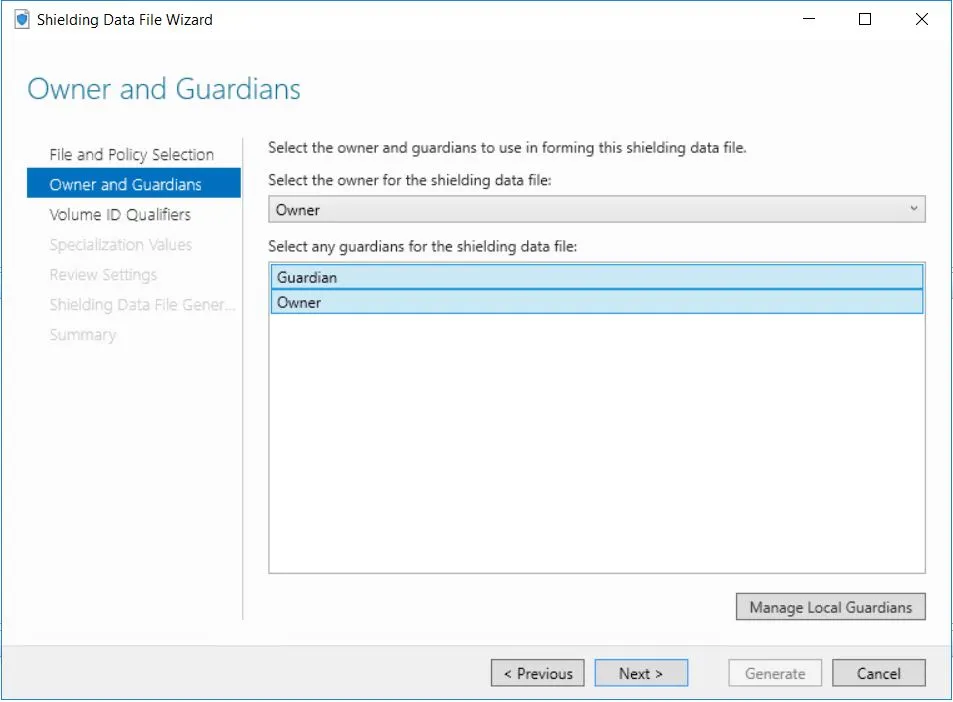
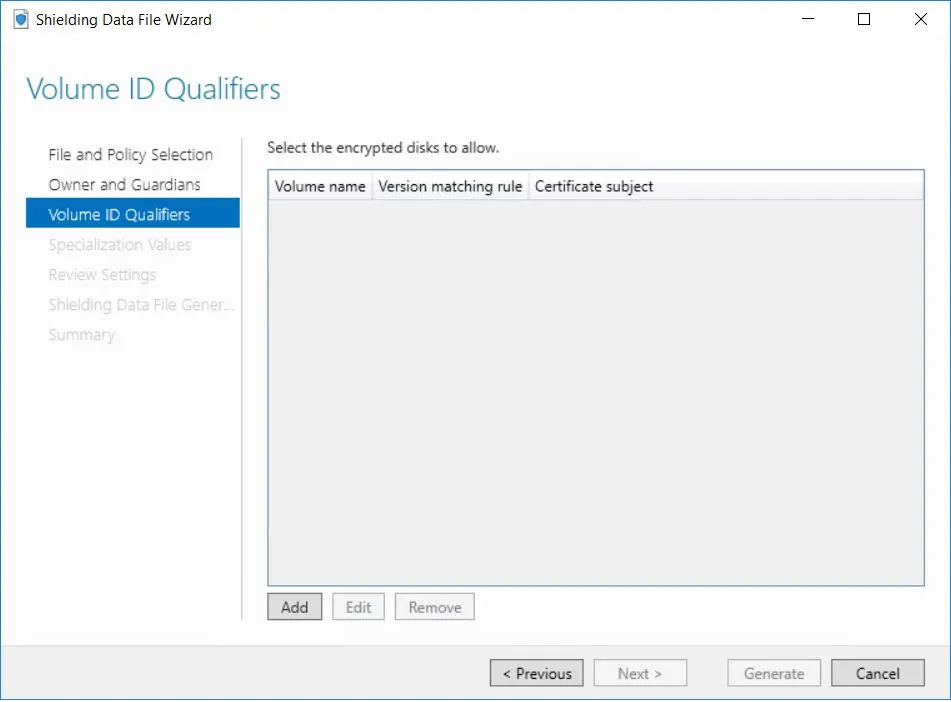
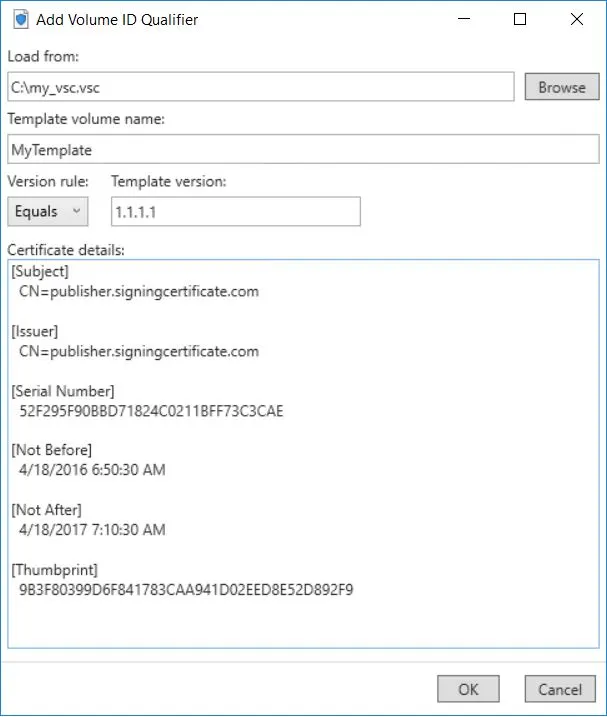
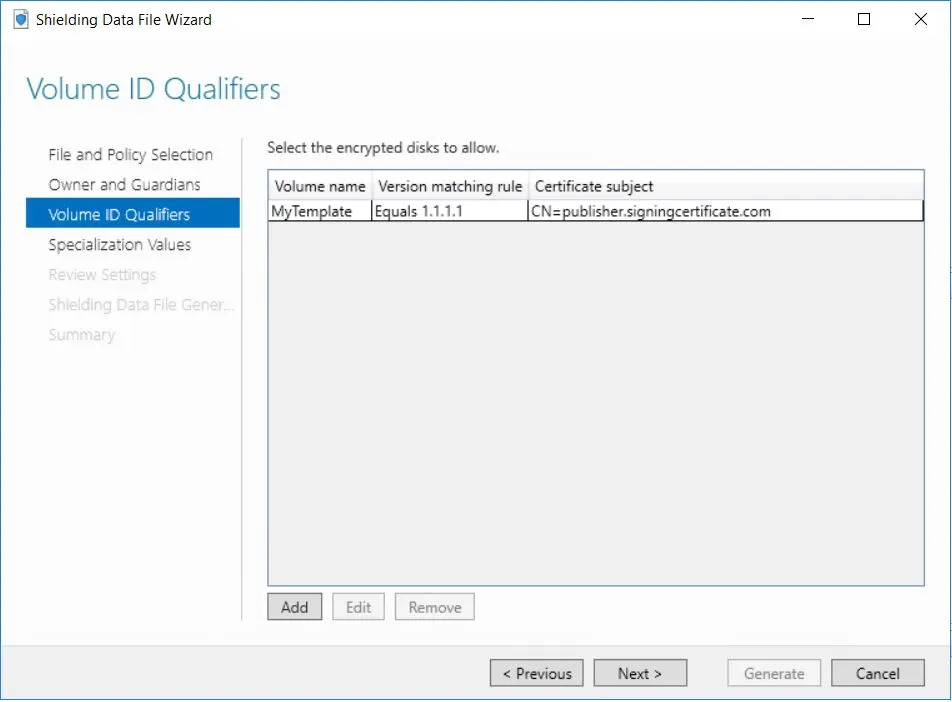
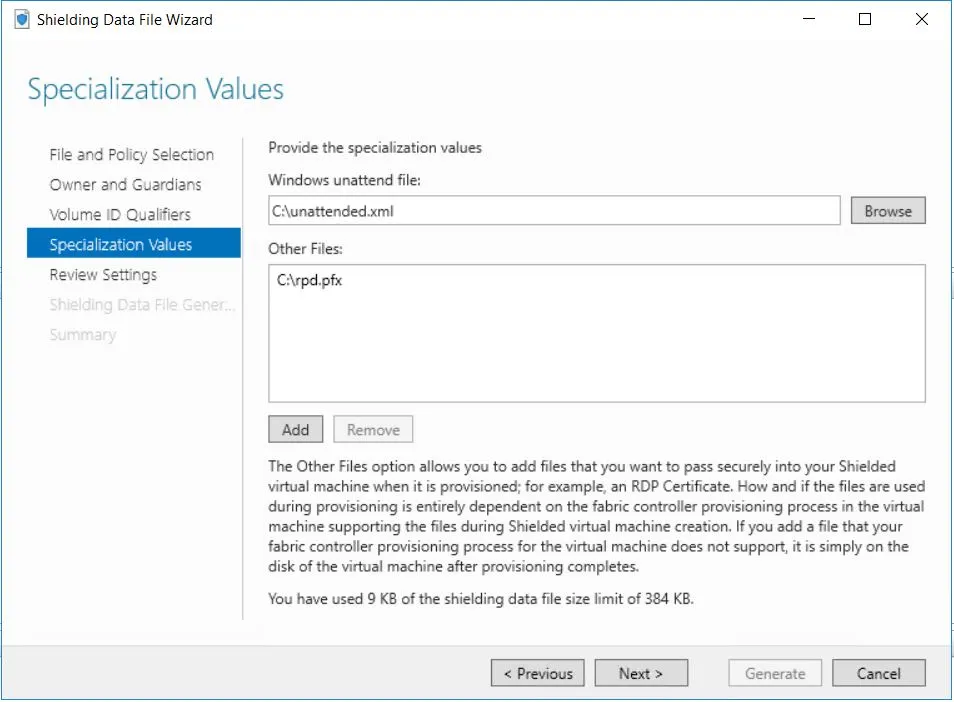
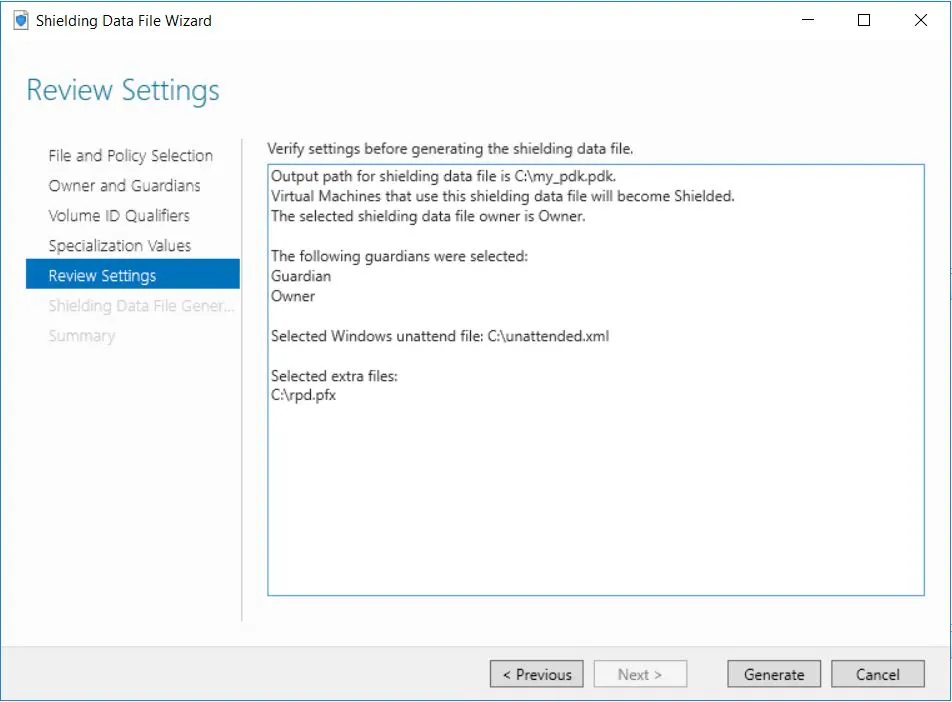
Generate a PDK File
Các thao tác được thực hiện trên giao diện Microsoft PowerShell
“http://$HGSDomain/KeyProtection/service/metadata/2014-07/metadata.xml”
$url=“http://$HGSDomain/KeyProtection/service/metadata/2014-07/metadata.xml”(New-Object System.Net.WebClient).DownloadFile($url, $GuardianMetadataPath)New-HgsGuardian –Name $OwnerName -GenerateCertificatesImport-HgsGuardian -Path $GuardianMetadataPath -Name $GuardianName -AllowUntrustedRoot
$TemplatePath = ‘C:\protected_template.vhdx’$VSCPath = ‘c:\vsc.vsc’# The VSC file describes the template that the .PDK file can be applied toSave-VolumeSignatureCatalog -TemplateDiskPath $signedTemplate `-VolumeSignatureCatalogPath $VSCPath
# $rdpcertificate.thumbprint will be added in the unattended file$rdpcertificate = New-SelfSignedCertificate -DnsName ts.examplerdpcertificate.com `-CertStoreLocation $certStoreLocation -KeyExportPolicy Exportable$rdpcertificatepassword = ConvertTo-SecureString -AsPlainText $rdpCertPasswd -Force Export-PfxCertificate -Cert$rdpcertificate -Password $rdpcertificatepassword ` -FilePath $rdpPath$rdpcertificate.thumbprint
$owner = Get-HgsGuardian -Name $OwnerName$guardian = Get-HgsGuardian -Name $GuardianName# Policy can be either EncryptionSupported or ShieldedProtect-ShieldingDataFile -ShieldingDataFilePath $PdkOutputPath -Owner $owner `-VolumeIDQualifier (New-VolumeIdQualifier -VolumeSignatureCatalogFilePath $VscPath `-VersionRule Equals) -WindowsUnattendFile $UnattendedPath -OtherFile $RdpCertPath `-Guardian $guardian -Policy Shielded
Boot a Shielded VM:
$vm = New-VM -Name $VMName -Generation 2 -VHDPath $TemplateVhdxPath -SwitchName “external”$pdk = Invoke-CimMethod -ClassName Msps_ProvisioningFileProcessor -Namespace root\msps `-MethodName PopulateFromFile -Arguments @{FilePath=$pdkFilePath }# the Key Protector contains the data regarding guarded hosts# it’s mandatory to pass a KeyProtector in order to enable the vtpm$kp = $pdk.ProvisioningFile.KeyProtector$vm | Set-VMKeyProtector -KeyProtector $kp# If during generating the pdk, the Policy was set to Shielded then $isShielded is $True$vm | Set-VMSecurityPolicy -Shielded $isShielded$vm | Enable-VMTPM# The unattended file can contain substitution strings for ComputerName, TimeZone, ProductKey.# The corresponding values or SpecializationDataPairs must be specified and will be added to a .fsk fileNew-ShieldedVMSpecializationDataFile -ShieldedVMSpecializationDataFilePath $fskFilePath `-SpecializationDataPairs @{“@@ComputerName@@”=“MyNewComputer”; `“@@TimeZone@@”=“Pacific Standard Time”}Initialize-ShieldedVM -ShieldingDataFilePath $pdkFilePath `-ShieldedVMSpecializationDataFilePath $fskFilePath `-VirtualMachine $vm
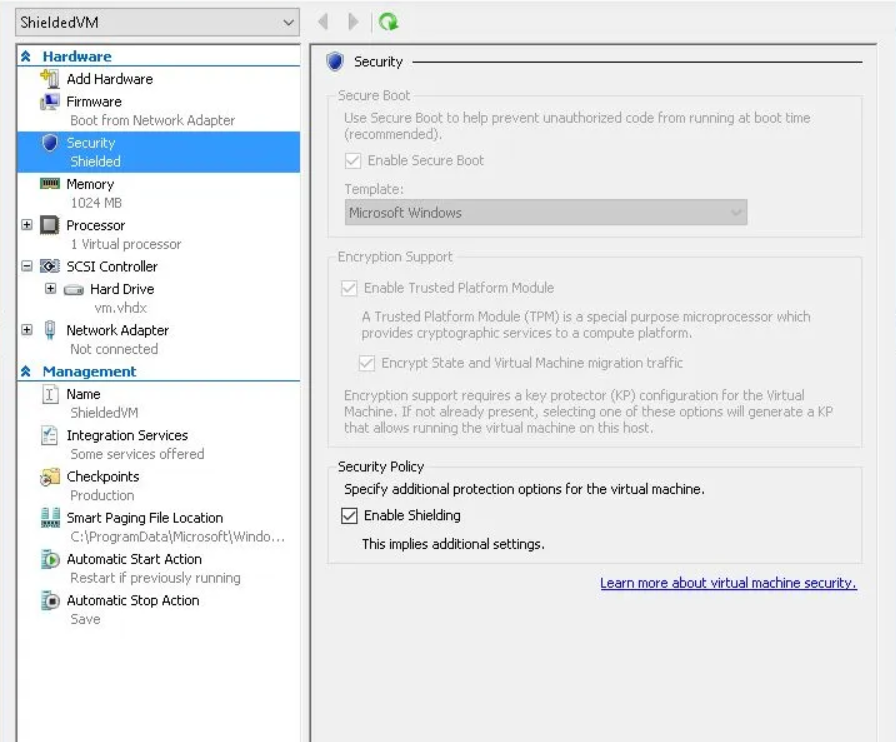
Kiểm tra cài đặt của VM, thấy rằng VM được bảo vệ. VM có thể được di chuyển trên bất kỳ Host nào, nhưng chỉ những Guarded Host mới có quyền truy cập vào dữ liệu của VM.